Tampilkan postingan dengan label transom. Tampilkan semua postingan

Rabu, 25 Januari 2017


Laser Leveling the Rear Transom
Originally uploaded by OzzyC.
In preparation of mounting the front transom, we used a laser level to make sure the rear transom was mounted correctly. The mounting of the front transom started immediately following this verification.
Read More..

Jumat, 13 Januari 2017

Had a handful of bronze screws left over so used these to screw on the stem and transom. 

the rest of the frames have now been set on the centerline and screwed to the saw horses with temporary braces.  I will add a few more braces prior to gluing the transom and stem permanently.

Yes.  It really will fit out the window on the back of the shop.
Read More..

Minggu, 25 Desember 2016


BoatBuilding - Cutting the Frames
Originally uploaded by OzzyC.
Over the last couple of weeks, weve been constructing temporary frame pieces, which were cutting out of particle board. The reason were doing this, and the process behind what were doing will take a little bit of explaination, so be prepared for a long entry.

The reason were cutting these temporary frame pieces is so that were sure the hull is straight. If you look at the picture, you may notice two pieces of board... one smaller piece of board, sitting on top of the particle board. The smaller piece is the actual frame piece that will be in the boat when its put on the water. The hull goes much farther up than this though, so we are using temporary pieces during the hull setting process. Once the hull is set, we will remove the temporary pieces and install the permanent pieces, so that we can add the deck.

In order to cut these sacrificial particle board frame pieces, we started with a 4x8 piece of particle board. We set the actual frame piece on the particle board and clamped it in place. We then determined the center point and line of the actual frame piece and extended this center line through the particle board, so that we could measure needed dimensions. After measuring the center line, we extended the end-lines of the permanent frame piece up the particle board, and measured from the center line to the top corners. In order to make sure our cuts were true, we measured cross-angle. we then added the notches and cut it all out with a power saw, except for the notches, where we used a jigsaw.

Click here to see the video summary of what we did.
Read More..

Jumat, 23 Desember 2016


Front Transom - Inside
Originally uploaded by OzzyC.
This is the front transom from "inside" the boat. Again, the purpose of this round of work was to fillet the front and rear transoms. If you notice at the top center of this pic, the thickened epoxy dripped. Why??? Because we were too lazy to run to the store for good duct tape. we used package tape instead, it didnt hold, and the peanut butter oozed through. This will cost us a lot more work in the long run, when its time to sand.
Read More..

Kamis, 24 November 2016


Mounting Frame Pieces
Originally uploaded by OzzyC.
Weve begun to mount the horizontal (port-to-starboard) frame pieces. There are six in all, and yesterday we mounted three.

We started by temporarily removing the stringers. This was Gregs idea, and I saw no need to keep them mounted, so they were pulled down. Next we measured the distances for all of the frame pieces, relative to the rear transom, and marked these distances on the building frame.

Next, we used the laser level to find the horizontal mounting point. We lined up the laser level with the reference point on the rear transom that we created a few weeks back. Next, we ran a piece of string down the bow-to-stern center line. This way we have the horizontal and vertical points of reference on each frame piece accurately measured. (You may remember that we drew these reference points on the frame pieces when we constructed them.)

Next we screwed 2x4 jigs into the building frame, in preparation for mounting the frame pieces to these same 2x4 jigs.

Next, we set the frame pieces on a floor jack, and lifted the jack to the correct height and center. This allowed us to make fine adjustments and get the frame pieces accurately placed. Once we lined up the horizontal points of reference with the laser level, and the vertical point of reference with the string, we screwed the frame pieces to the 2x4 jigs. This process went very quickly.

NOTE: Once we got the second frame piece mounted, we reset the stringers in place, knowing that it would be difficult to place them later.


Click here to see the video summary of what we did.

Read More..

Selasa, 18 Oktober 2016

We reached another major milestone yesterday... we finished glassing the exterior of the hull. Now were on to the long task of fairing and sanding. Based on our current pace, I expect this to take about three months.
Read More..

Senin, 12 September 2016


Transom mounts
Originally uploaded by OzzyC.


Rear Transom Mounted
Originally uploaded by OzzyC.

Last weekend we mounted the rear transom to the working frame. We started by constructing the vertical frame mounts. The vertical frame mounts were built from the bottom up, using 2x4s screwed to the 2x6 frame on the floor, and then screwing the two angle-cut 2x6s to the 2x4s. The angle-cut 2x6s are cut to the same angle as the stringers where they attach to the transom. This is shown in the first picture.

Next, we mounted the rear transom to the angle cut frame piece with screws. When you put the transom on the frame, make sure its level and that the angle cut mounts are placed an equal distance from the center, and in a place that wont interfere with construction.


Read More..

Rabu, 07 September 2016


Yesterday we glassed the rear transom. After we glass the front transom (which we plan to do next weekend), well be done glassing the exterior. Then comes the fairing.

Weve gotten pretty good at laying glass, and have devised a method that lets us lay two layers at once. The first time we did it was a little tough, but through a little trial and error, weve got it down to a science. By doing two layers at once we are saving time and I think well have a stronger boat, because laying two layers at once will give us a single chemical bond in addition to the physical bond. It also seems to cut down on the amount of sanding we need to do.


Heres a picture of the glassed side (which we did last week). We glassed the side using the aforementioned both-layers-at-once method, and Im quite pleased with the results. Glassing the side took us about four hours using this method, and the rear transom took about two hours.

Our double layer method consists of measuring the glass cloth and laying them in place, and laying a coat of epoxy thick enough to saturate both layers of glass. The horizontal surfaces are very easy, but the vertical surfaces are a little more tricky. Weve found that its best to use a roller to work a thick layer of epoxy into the glass at the top, and then slowly squeegee the excess down the side. Make sure to do this very slowly, so the epoxy has a chance to saturate the cloth as you go down. If the epoxy is rolling down the surface as you use the squeegee, youre moving too quickly.

One note: I do NOT recommend doing this double-layer method unless youve got two people for the task.
Read More..

Selasa, 09 Agustus 2016


Sanding, Sanding...
Originally uploaded by OzzyC.
... which you see in the photo...
Read More..

Senin, 08 Agustus 2016


Mounting the Front Transom
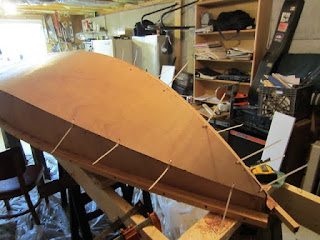
Originally uploaded by OzzyC.
We hit another milestone by getting the front transom mounted to the jig.

This process needed to be even more precise than the process of mounting the rear transom. With the rear transom, we needed to make sure that we were correct on two axes... think X,Y axis from geometry class. When we mounted the rear transom, we had to make sure our measurements were consistent on both the X and Y axes, or the whole boat would be off.

When we mounted the front transom, we had to make sure that we had correct measurements on all three axes... think X,Y and Z axis from trig classes.

This accomplishment took a lot of thought and planning. We had to make sure the transom was at the correct angle. If the angle was too small, the boat would have a flat front, and woldnt plane correctly. If the angle was too big, the bow of the boat would be too low, potentially allowing water to come over the bow. In order to accomplish this, we cut pieces of 2x6 to the correct angle, and screwed these pieces into the transom. We then screwed sections of 2x4 onto these 2x6s. The 2x4s would be then screwed into the jig frame on the floor.

In the accompanying picture, you will also see that we screwed a second 2x4-and-2x2 section onto the back of the 2x6 angle pieces, and the 2x2s stick up a little more than 6 inches from the center of the bottom of the front transom. This is because the reference line is 6 inches below the point of the transom. (Remember, were building this upside-down for the moment, so thats why the 2x2s are pointing up.) We used two pieces of 2x2, set in equal positions relative to the center point of the transom, so that we have two points of measurement, to ensure maximum accuracy.

Next, we rough-set the transom onto the jig frame, and clamped it to the jig, so that we could tweak our settings, setting the transom in place permanently with screws. After clamping the transom to the jig frame, we used a level and a tape measure to ensure we had things absolutely accurate. We checked the height using the laser level, making sure the reference points (marked on the 2x2s) were accurate relative to the reference points on the rear transom. We checked the distance from the rear transom by measuring the distance from the front to back on both the left and right sides. We made sure the transoms were centered correctly by measuring from front-left to rear right, and by front-right to rear-left. We knew we were good to go when we verified that these measurements were the same distance.
Read More..

Selasa, 19 Juli 2016

I installed the cross braces at station 3 and 10 today.  Michalak says the one at 3 is probably optional, but I plan on keeping it as it might make a nice place to tie a temporary anchor or help tie it to the roof of the car. 

This is the bottom, zip tied in place.  I was using wire, but gave up after punching a few holes in my hands.  This is much more user friendly. 

The bow twist is a little difficult to get to lie flat.  From here it is nothing some filler (ok, lots of it) and glass wont hide.  This took a lot of patience and some easing the center seam with a hand saw.  I was just glad that I put the halfs together in the correct orientation.  That would have been annoying.  The zip ties work well.  I believe I can sand right over them and leave them inside the putty. 


Another view. 

I got a little too aggresive easing the center seam in the middle of the boat.  Once again, filler and sanding should hide it pretty good.  I am not looking forward to working upside down in here.

?
These 1/4" holes allowed me to use a larger size zip tie 8" long.  that really helped a lot with the assembly.  If I were to do it again, I would loosely join the two panels, secure the edges and do the final trimming on the centerline last. 
?
Read More..

Sabtu, 11 Juni 2016


Front Transom Overhang
Originally uploaded by OzzyC.
The overhang on the front transom is more pronounced than the rear transom. Again, the hull extends past the front transom.

Though this makes for a bit more work, Id rather have the pieces measure too large than too small. Its a lot easier to cut away the excess than it is to build on a piece thats too short.
Read More..

Minggu, 29 Mei 2016

In my last post, Dr. Howdy has (quite rightly) recommended that I give some credit to the designer/architect of this fine boat. Greg purchased the plans from www.bateau.com. I will work to find out more about the individual who designed this boat and will post as the designer deems fit.
Read More..

Sabtu, 16 April 2016


Patched Front Transom Gap
Originally uploaded by OzzyC.
We went around the entire boat and patched all gaps, holes, gouges, and so forth, with thickened epoxy.
Read More..

Rabu, 13 April 2016

The following is a comment from Squid, a member of the forum at www.bateau.com

The picture Squids referring to is shown earlier in the blog, but you can click here for a direct link to the picture.


---Begin original comment---
[S]hure looks like a flat bottomed boat at the transome end. How do you think it will handle in the chop and wind. I know they have wind in Iowa. I am interested in building this boat but will wait till you have yours done and can tell me how it handles. Squid.
---End original comment---

This is a valid point, and one that I honestly hadnt considered. But even if I had, this boat actually belongs to my friend Greg, so I didnt have much input on which plans were actually purchased. Im just the first mate. (Call me Gilligan.) Now that the point is brought up though, heres my take.

Youre absolutely correct, this is a flat-bottomed boat. The result is that it will probably rock-n-roll a little more in choppy water, but I wouldnt worry about that a whole lot. Its going to be a big, heavy boat, so I suspect that itll take quite a bit to make the boat roll excessively. As far as the wind goes, I dont think itll be a huge factor. The rear transom isnt much different from your standard power boat, so I suspect the amount of surface area that the wind could catch is probably comparable to a standard displacement hull. The front transom is relatively small, so I dont see wind as a factor here either, and the same goes for the sides. Besides, its not like were rowing this big-ass boat. Gregs going to put in a couple of big motors to do the work for us.

In short, the only way I see wind being a factor is when the wind causes waves on the water, in which case the boat will probably rock a bit more than a displacement hulled boat.
Read More..

Kamis, 31 Maret 2016


Trimmed Transom
Originally uploaded by OzzyC.
Greg got the overhang trimmed from the front and rear transom, using a jigsaw. It looks a lot better now.
Read More..

Jumat, 18 Maret 2016

I finished the stem this morning, as I had it cut out in the woodshop at my High School.  The commercial grade 10" table saw made very quick work of this. 

?
stem from chunk of 2X4 mahogany.
? Then on to the forms and transom.  Had enough leftover mahogany in the garage for these parts. 

forms 2, 4, 9 (6 is under the bench)
This boat is pretty straightforward to build, and the shape is easy on the eyes.


transom, with mahogany frame and coated with epoxy (leftover from the batch, not wanting to waste it).
now taking a break as the bottom is getting the second side of the fiberglass butt joint.

?
4 gallons of water, a smooth board, plastic, and a heat lamp. works pretty good.
?These are the 6 6" oars.  The plans call for 7 footers, but this is what I happen to own.  Will sand these and apply new epoxy, varnish, leathers, etc.  The empty wine rack is a sad site.  No time to fill it with the boat being built. 
Read More..

Minggu, 13 Maret 2016


Taping 002
Originally uploaded by OzzyC.
We havent done much the last couple of weeks, because my wife and I went on our honeymoon. Greg did a little work while I was gone, but not a whole lot... mainly a few last-minute things before doing what we did last night... laying tape!

Thats right, we laid tape on the three long seams. Greg said that hed to the transoms today, so we have not only a good physical bond, but a good chemical bond with the epoxy as well.
Read More..

Senin, 07 Maret 2016


Hull
Originally uploaded by OzzyC.
Weve got the joints epoxied, and the zip ties are pulled out. You may notice a couple of sloppy tape joints. Well need to fix them before we glass the whole boat. If you click on the picture, youll be referred to flickr, where you can see a larger picture, and a note pointing out the sloppy tape joint.
Read More..