Tampilkan postingan dengan label to. Tampilkan semua postingan

Sabtu, 14 Januari 2017


Boys Trip 2006 035
Originally uploaded by OzzyC.
Per our tradition, we took our boys trip over Memorial Day weekend. For several years we have been travelling staying in Nicolette Forest in northease Wisconsin, for a few days of whitewater kayaking. This year, we decided to get back to our roots and do some canoeing. Greg and I took things a step further, and rigged up the Nice Canoes we built a couple of years ago as a makeshift catamaran. Greg, being engineer-boy, calculated the dimensions, measured the sail, and determined where to put the various parts. It worked surprisingly well -- for one day. The boat was structurally sound, but anything that directly related to the sailing aspect was woefully under-engineered. Stay tuned for the complete story... its quite a ride.
Read More..

Selasa, 10 Januari 2017

The fairing and sanding continues. Greg read about a really neat idea that will likely save us countless hours of eyeballing, and in the end, provide us with a significantly more accurate finished product...

In my last entry, you saw the level that showed approximately how much filling we need to do. Well, Greg decided to wrap that level in plastic, run a strip of filler under where the level was, and then essentially mash the level into the filler and let things dry. After the filler dried, he removed the level, shaved down the excess epoxy and voila, he had a "rail" that gave us a guide for how much filler we need to use. By running a second "rail" down the center, and a third one down the other side, we had a rail system built, which will allow us to roll out a single, thick, accurate layer of filler and dramatically reduce the amount of sanding and fairing we will need to do. A stroke of genius!


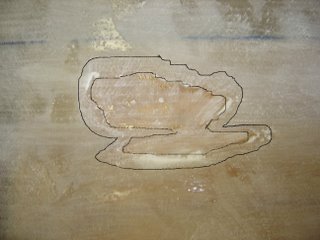
On the downside, when sanding yesterday, we came across a big spot that was starved for epoxy, as shown (and outlined) in the picture to the right. This is an area thats come back to haunt us from way-back-when. The area is approximately 4"X3." Its nothing that cant be overcome, but is a little frustrating.

We have yet to decide how to address the issue, but Greg has two ideas... one is to use fiberglass filler and epoxy, the other is to use glass micro-filler and epoxy. Ive found one or two other spots like this, but theyre small, in non-structural areas, and easy to fix.


Heres another small stroke of genius Greg ran across...

-Are you tired of constantly stirring epoxy and/or thickener?

-Are you working by yourself and would like to save a little time?

-Are you working with fast hardener, and tired of worrying if its going to kick too quickly?

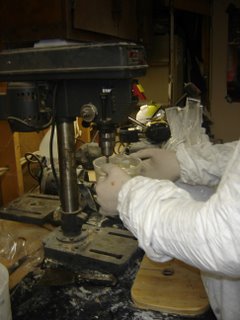
If any of these problems apply to you, then you should try what Gregs doing in this picture to the right. Use a drill (or drill press) and a paint-stirring bit to do the work for you. Its quicker and easier. Just remember to take measures to protect your drill. It would really suck if you ended ruining your drill because it got all gummed up with epoxy.
Read More..

Kamis, 05 Januari 2017

As I mentioned in my last post, we took some video of our last work session. The majority of this video footage covers tasks weve completed to date, a quick summary of some of our day-to-day tasks, and a couple of things weve learned along the way. This post is primarily to post links to the videos we made. I apologize in advance for the poor audio quality (we left the TV on in the background, and it is a little distracting), but I am posting this in the hope that youll pick up a couple of tips and tricks that we learned along the way. It will also let you actually see who we are, and what our workshop is like.

Video of the epoxy tray we made
Mixing the epoxy
Applying the epoxy sealer coat
Mixing the thickened epoxy (Peanut Butter)
Be careful after you lay the epoxy

After laying the sealer coat of unthickened epoxy to each surface to be glued, lay the thickened epoxy on one of the sealed surfaces with a trowel. After the thickened epoxy is applied, set the pieces together, weigh them down to ensure a good solid bond between the surfaces, and apply a couple of screws to hold the surfaces together. We specifically recommend the weighting and screwing process, as if you dont weight them down, you may not get a nice tight fit. If you dont screw the pieces together, the epoxy can act as a lubricant between the fitted pieces between when the surfaces are laid together, and when the epoxy sets. The result is that you can end up with the pieces sliding a little, and the fit of the boards is not as precise. You can remove the screws after the epoxy has dried.
Read More..

Rabu, 28 Desember 2016

Paragliding - Freedom To Fly
Panduan Terbang Bebas Melayang Di Udara dengan Paragliding


Berani adu nyali ? Berani meliuk-liuk di udara bagai burung yang menikmati kebebasannya. Yup ! paragliding lah salah satu jawabannya.Paragliding adalah olah raga yang sangat unik, alat yang digunakan adalah parasut yang dibagian bawahnya terdapat semacam kursi untuk duduk. Olah raga tersebut sangat menarik, namun sangat tidak dianjurkan bagi mereka yang memiliki penyakit jantung, tekanan darah tinggi, dan epilepsi.

Berbeda dengan beberapa olah raga terbang lainnya, paragliding tidak memiliki batasan umur sehingga anak-anak sekalipun bisa ikut merasakan dengan catatan disertai seorang pemandu atau yang lebih dikenal dengan sebutan tandem. Bahkan kalau mau ditilik lebih jauh lagi, tandem ini mutlak harus diikutsertakan oleh para peminta yang belum memiliki lisensi terbang.

Di Indonesia sulit sekali mendapatkan panduan olahraga dirgantara paragliding ini. Panduan paragliding kali ini berisi video tutorial dan ebook dibawakan oleh pakar paragliding. Diajarkan tehnik dasar mulai dari ground hingga tehnik terbang dan melayang diudara.
Video Tutorial :
Starting Powered Paragliding Freedom To Fly


Ebook tutorial :
Paragliding, The Complete Guide
The Art of Paragliding

Harga Rp 55.000,-

Read More..
Dvd video step by step panduan membuat terarium yang exotis


Keterbatasan lahan bukanlah halangan untuk memelihara dan mendapatkan kesenangan dari tanaman hias. Terarium menjadi solusinya. Terarium mampu menghadirkan nilai artistik tersendiri , yang tidak dapat ditemui pada tanaman yang sekedar diletakkan pada rak susun, dalam pot atau bahkan taman yang luas.

Terarium adalah media yang terbuat dari kaca atau plastik transparan berisi tanaman, yang diperuntukkan bagi beragam kebutuhan, seperti untuk penelitian, metode bercocok tanam maupun dekorasi dan hobby. Terarium merupakan biosfer buatan yang paling alami karena fungsi biologis yang terjadi dalam terarium pun mirip dengan yang terjadi di alam.
Terarium akan menampilkan taman miniatur dalam media kaca. Terarium dapat mensimulasikan kondisi di alam yang sebenarnya dalam media kaca tersebut. Misalnya terarim dapat mensimulasikan ekosistem gurun, ekosistem padang pasir,taman, ekosistem hutan hujan tropis maupun lainnya.


Terarium 
Terarium Udara Terbuka, yaitu terarium dengan bagian atas terbuka atau tidak tertutup. Untuk membuat miniatur tanaman, media seperti ini yang paling mudah digunakan dan dirawat. Anda bahkan dapat membuat dekorasi tanaman dalam terarium jenis ini dalam waktu yang sangat singkat.

Terarium Tertutup, yaitu terarium dengan kondisi tertutup rapat di semua bagian. Tujuannya untuk membuat biosfer yang unik di dalam terarium tersebut.Lebih banyak tantangan dalam membuat terarium jenis ini. Beberapa faktor yang harus menjadi perhatian khusus untuk terarium tertutup adalah masalah jumlah air dan pencahayaan yang tepat. Terarium jenis ini biasanya memiliki bagian atas yang kecil untuk meletakkan tanaman dan material lainnya di dalam terarium. Tentu ini bisa menjadi tantangan tersendiri.
Terarium Binatang, seperti namanya, terarium jenis ini digunakan untuk meletakkan binatang kecil untuk dipajang. Misalnya kadal, iguana, katak, kura-kura kecil atau ular. Tujuannya untuk menampilkan tiruan dari dunia fauna yang sebenarnya di alam bebas dengan memindahkannya ke media kaca yang menarik.

Jenis Tanaman Terarium 
Mengingat terarium merupakan media kaca yang ukurannya terbatas dan memiliki biosfer yang unik, maka pemilihan tanaman yang diletakkan di dalam terarium juga haruslah tepat. Beberapa tanaman yang biasa digunakan dalam terarium antara lain sansiviera, kaktus, sukulen dan bromelia dan lainya.


Buat teman-teman yang ingin membuat terrarium sendiri saya sediakan berupa paket video tutorial  terraium langkah demi langkah yang mudah diikuti shingga sangat mudah untuk di praktekan.

How to terrarium-Dvd panduan membuat terrarium
Isi 18 video terrarium :
  1. Exotic aquatic  terrarium
  2. How to build a terrarium
  3. How to make a cactus terrarium
  4. How to make a desert terrarium
  5. How to make a micro terrarium
  6. How to make a reptile terrarium
  7. How to make a terrarium garden
  8. How to make a treefrog and tropical lizard terrarium part 1
  9. How to make a treefrog and tropical lizard terrarium part 2
  10. How to set up a terrarium
  11. Make a moss terrarium
  12. Making carnivorous plant terrarium
  13. Iguana terrarium set up
  14. New terrariums from reptology
  15. Pet tree frogs newts toads in aqua terrarium set up part 1
  16. Pet tree frogs newts toads in aqua terrarium set up part 2
  17. Terrarium how to
  18. Terrariums for kids

Keterangan : Paket bisa dibuka di komputer dan player
Harga Rp 75.000.-
Read More..

Minggu, 25 Desember 2016


BoatBuilding - Cutting the Frames
Originally uploaded by OzzyC.
Over the last couple of weeks, weve been constructing temporary frame pieces, which were cutting out of particle board. The reason were doing this, and the process behind what were doing will take a little bit of explaination, so be prepared for a long entry.

The reason were cutting these temporary frame pieces is so that were sure the hull is straight. If you look at the picture, you may notice two pieces of board... one smaller piece of board, sitting on top of the particle board. The smaller piece is the actual frame piece that will be in the boat when its put on the water. The hull goes much farther up than this though, so we are using temporary pieces during the hull setting process. Once the hull is set, we will remove the temporary pieces and install the permanent pieces, so that we can add the deck.

In order to cut these sacrificial particle board frame pieces, we started with a 4x8 piece of particle board. We set the actual frame piece on the particle board and clamped it in place. We then determined the center point and line of the actual frame piece and extended this center line through the particle board, so that we could measure needed dimensions. After measuring the center line, we extended the end-lines of the permanent frame piece up the particle board, and measured from the center line to the top corners. In order to make sure our cuts were true, we measured cross-angle. we then added the notches and cut it all out with a power saw, except for the notches, where we used a jigsaw.

Click here to see the video summary of what we did.
Read More..

Sabtu, 24 Desember 2016


Heating the Glass Close-Up
Originally uploaded by OzzyC.
As mentioned in the last entry, we used a heat gun to heat up the stiff fiberglass, and soften the epoxy. Immediately upon softening, we laid a cool metal weight on top of the newly-softened fiberglass. This helped the fiberglass lay flat as it should.

As we went, we learned that we could run the heat gun in front of the weight, which would heat the fiberglass and epoxy, and we could immediately slide a weight behind the heated area. this would ensure the area would lay flat. Ive gotta say, it was a pretty clever trick.
Read More..

Selasa, 13 Desember 2016


CrappyGluing
Originally uploaded by OzzyC.
After we cut the excess length off of the rear transom, we decided to test the strength of the epoxy. I figured a drop test would be the best way to get a guage of how strong our gluing job was, and I was concerned with the results.

I dropped the excess from about five feet, to see how well it would hold up to a shock. The results werent good. One of the four layers completely broke away. The second layer, as shown in this picture, split about 2/3 of the way through.

The moral of the story?? Use more glue than we did. In order to compensate for the lack of glue, we are going to reinforce the rear transom with several bronze screws. Were going to use bronze screws because they wont corrode over time.
Read More..

Kamis, 01 Desember 2016


Reinforced Stringers 1
Originally uploaded by OzzyC.
Its best to take your time when you set the fiberglass tape on the joints. If you fail to adequately saturate the tape with epoxy, or if you fail to adequately set the tape onto the wood, the tape wont bond well to the wood, as shown in this picture.

Its really not a big deal to correct this problem; all we had to do was cut away the tape that didnt bond to the wood, feather the edges and lay down another piece of saturated tape... but it would have been nice to have gotten it right the first time.
Read More..

Sabtu, 26 November 2016


Flaw in the Rubrail
Originally uploaded by OzzyC.
In a continuation of "back to basics" week, I will discuss this rubrail in a bit more detail.

We purchased 10-foot sections of oak, which is obviously too short for the entire canoe. We compensated for this by angle-cutting the oak sections and joining them together with epoxy. We did the joints at port-bow and starboard-stern, for load balancing. This way if we hit something that would break one joint, they both wouldnt break.

This spring, my boat hit a rock in rapids, and popped the rubrail joint. I tried patching the popped joint with gorilla glue, but that was inadequate for the job, and the joint popped again, (on a much smaller rock, at a much lower speed.)

As you can imagine, I was starting to get a little frustrated over my canoe continually "breaking." I figured it was time to do the job right, so I decided to sand and re-epoxy the joint from scratch.

Unfortunately, my daughter wanted to help, and due to a perfect storm of circumstances, I didnt quite mix the epoxy right, and it never quite set. Growing even more weary of this ongoing problem, I sunk a couple of bronze nails into the seams, figuring that would do it. Thats when I sanded and painted the boat, and when I noticed the flaw in this picture. If you look VERY closely (not the best picture), you can see that theres no epoxy bonding the rubrail to the hull. Once the paint dries, but before I stain the rubrails, I will bond the rubrail to the hull with a thin line of unthickened epoxy.
Read More..

Jumat, 18 November 2016


Heating the Glass I
Originally uploaded by OzzyC.
We ("we" being Greg for the most part) thought about possible solutions for our problem on how to get the partially-wetted fiberglass to properly adhere to the hull. After a week or so, Greg found the answer. We used a heat gun and softened the epoxy in the areas where the fiberglass was bubbled up from the hull.
Read More..

Rabu, 16 November 2016

is grey the new black?
well it is for me!

8 years ago (day less, day more), I took a decision that I was pondering for a really long time.

... Stop dyeing my hair and let it go grey.
mmmhh. Not an easy decision.

I was always attracted by women not yet very old, proudly showing their grey hair.
But when I had my first greys... I covered them up.
I started quite young, but got into the dyeing routine every 3-4 weeks when I was 30 +/-.

After so many years I was thinking to go grey, but wasnt sure, then I couldnt handle the (literally) grey area between brunette, brunette with lots of roots and grey.
Finally, decision. I would do it!

I believe this is the only picture I have of the "let the roots go crazy" period:
I spent probably more than a month in a pony tail!


My hairdresser was pushing me into this direction (hes a good hairdresser, not very good if you look from the marketing point of view!!) saying that I had the right features to look good in it.


Well, if youre leaning toward this direction, I can tell you few things that I love and hate about going grey.

? GREY TO LOVE ?

1- No dye. Means no chemical, and your hair gets stronger-er-er.
2- No roots. No needs to comment!
3- Time saving. Whether you are a diy dyer or a hairdresser one, you dont have to do it. Considering 45 minutes if diy or 1.5 hr if you go to the hairdresser every 3 to 4 weeks, youll have at least 9 extra hours/year to do other things than dyeing your hair.
4- Money saving. A lot. Again... need to comment?
5- When Im tan, or with make up on I LOVE the look, its so stylish and sophisticated.

? GREY TO HATE ?

1- You do look older, a little. Lets not get in denial: guessing age gets easier... grrr...
2- Pick the right haircut. Not all the haircuts look good in grey just like with a full color. Play around until you find your right style. (this is not a real hate just a tad annoying)
3- Youll be asked why. But I do hate other kind of stupid questions not hair related that people ask.
4- Some change in color choices in clothing. But again, we all look better in one color than another.


I cant really think of anything else, overall, I passed the "7 years itch" and still love my grey hair.

I changed different styles, and length, and so far in my case, short works better.


? WAY TO GO GREY... HOW TO ?


1- In my opinion, the best and fast way to go grey: once your roots are lets say 1" long... get a short haircut and youve done with the past!
2- If youre scared of very short hair, you can let your roots grow and when you have figured out the shade of grey youre in, ask your hairdresser to do grey highlights (this is an extra chemical process) - and consider a good haircut
3- Go at you hairdresser appointment with make up on and clothes in a deep, rich color: going from dark to grey will make you like youre fading and wearing light beige or light grey or pastels will look weird at first (see #4 in things I hate)
4- At the time, I tried to camouflage the roots for a while with some coloring shampoo. White hair absorbs much more color, and this technique didnt work for me. Even if the shampoo isnt permanent, the white hair will turn yellow-ish and as a result, made my process of going grey a little longer.
5- After youll turn grey, use a shampoo which has a deep purple pigment: it keeps hair silver preventing the yellowing

If youre trying to make up your mind and take a decision, I hope this was enlightening and helpful!

Are you pondering the idea of grey?

xox, d.
Read More..

Jumat, 04 November 2016

Akeem does some finishing work (top). One group works together to mix the apoxy in order to glue the scarf joints (bottom).

The very cold air did not deter our 12 participants and 10 volunteers from arriving ready for work. Today group 2 was to replicate what the first group started on their canoe last weekend.
The following comments were made by participants in the second group after their first day at work on Peace Canoe #2:
MJ (age 11) Its fun! I get to help make a boat. My part today was working on the hull and one side of the boat, it is a fun project.
T. Graham (age 14) I like to build with legos, so getting to build something like a canoe is very interesting.
Maurice (age 15) It was exhilarating! We had to lift cinder blocks to brace the scarf joints.
Tammy (age 10) It was fun, because we are treated like an adult. We got to use many tools and supplies that we could not use at home. It was exquisite!
Deion (age 13) It was fun! I got to experience something I never did and never thought Id do. I feel proud to be a part of Boat Building by the Bay.
Keyshawn (age 11) I helped put together the sides of the canoe by nailing. I liked working with the other kids, because we made a good team.
Dalontay (age 9) My group marked the lines for cutting and then we used the glue gun to glue the sides.
Today was another successful day at the McNasby "Boat Shop," we meet again on February 7th and 14th if you are around Eastport, we welcome you to stop in and see our progress between 9am and 1pm.

Read More..

Selasa, 18 Oktober 2016

We reached another major milestone yesterday... we finished glassing the exterior of the hull. Now were on to the long task of fairing and sanding. Based on our current pace, I expect this to take about three months.
Read More..

Selasa, 27 September 2016


Boys Trip 2006 055
Originally uploaded by OzzyC.
Our construction process was precise yet simple. Engineer-boy took the measurements and did the conversion mainly with things he already had laying around his garage... plywood, 2x4s, wooden dowels, ratchet straps, hose clamps, lag bolts and so forth. About the only parts he needed to buy were the flagpole that we used for the mast, and the tarp that he cut to the shape of a sail.

When we got to the reservoir, we spent the first two hours or so assembling the catamaran. By the time we finished the construction, got to camp, set up the tent and ate, it was time to go to bed. Additionally, the maiden voyage from the landing to the island occurred on a day with almost no wind. We were able to make our way to the island, but it was slow going. Our real test would have to wait for another day.
Read More..

Kamis, 22 September 2016

We laid some more glass yesterday, but Im going to digress a bit.

You may remember in an earlier post that we had a couple of spots where the fiberglass didnt adhere to the plywood. Our initial plan was to drill small holes in these areas and fill them with epoxy. Greg changed his mind. Instead, he cut out these areas with a knife, and filled it with a mixture of epoxy and fiberglass filler. My camera batteries were dead, so I dont have any pics of this, but I will attempt to get some pics posted soon.

After the fiberglass filling, we did a little last-minute sanding, and laid fiberglass on one side. Weve now got about two-thirds of the exterior completely fiberglassed. We still have one side, and both transoms to do, but that should go relatively quick. Of course Ill post pictures.
Read More..

Rabu, 21 September 2016

Many want to know how hard building a boat is. Well truth of the matter it is can be simple or it could be quite hard. It just matters on what type of boat you want to build. When it comes to the designs and boat building, they can be quite simple or hard. There are a few things that could make your boat design difficult.

If you are new to making boats and all that, when you first begin reading a boat plan you might be a little lost. You might even think that boat building isnt easy. This is because they use shorthand and you will still be getting used to all the terms. However, it gets easier as you go.

Knowing what materials to use could make boat building seem tough. There are many choices and when you choose one material there might be all sorts of things that could fall in that category to use. You just have to know your stuff, but there are plenty of resources out there that can guide you.
The bigger the boat, the harder it will be. That is a given. Also, the more things you add to the boat the harder it will be. There are things like the hull and so forth that have to be calculated just right in order for you to fully finish and have a successful boat that you are proud of. Boat building can be a hobby and those who find it a hobby are the ones who dont find it as challenging to do. There is a lot to consider when building a boat and people learn quickly that it doesnt always have to be as complicated. Using resources and using practice can make it easier than you think. Is it hard or easy? Time will tell.


Article Source: http://EzineArticles.com/3000398
Read More..

Selasa, 13 September 2016

Dvd tehnik merajut untuk membuat berbagai macam barang


Merajut adalah metode membuat kain, pakaian atau perlengkapan busana dari benang rajut dengan menggunakan sehelai benang
Seiring dengan perkembangan zaman serta makin bervariasinya benang baik dari variasi warna ataupun campuran materinya maka dunia merajut telah berkembang luas dimana hasil rajutannya telah bermacam-macam jenisnya tidak hanya sebatas pada taplak, sweater dan syal, akan tetapi sudah merambah ke tas, dompet, asesoris,afghan bahkan kepada salah satu bidang merajut yang mulai digemari orang yaitu amigurumi.
Teknik merajut dengan sebatang jarum rajut disebut merenda (bahasa Inggris: crochet). 
Cara ini menggunakan satu jarum dimana satu tangan memegang jarum sedangkan satu tangan yang lain  memegang benang.
Berikut adalah dvd tehnik merajut yang akan di jelaskan langkah demi langkah sehingga akan menghasilkan barang sesuai dengan kehendak Anda, tehnik ini berupa video supaya lebih mudah dalam mengikuti dan mempraktekanya.
Merajut akan banyak menghasilkan berbagai macam barang tergantung dari kreativitas
Gambar hasil dari kreasi merajut


Paket -Crochet afghan stitch tunisian
Rp 50.000.-


Read More..

Senin, 12 September 2016


Transom mounts
Originally uploaded by OzzyC.


Rear Transom Mounted
Originally uploaded by OzzyC.

Last weekend we mounted the rear transom to the working frame. We started by constructing the vertical frame mounts. The vertical frame mounts were built from the bottom up, using 2x4s screwed to the 2x6 frame on the floor, and then screwing the two angle-cut 2x6s to the 2x4s. The angle-cut 2x6s are cut to the same angle as the stringers where they attach to the transom. This is shown in the first picture.

Next, we mounted the rear transom to the angle cut frame piece with screws. When you put the transom on the frame, make sure its level and that the angle cut mounts are placed an equal distance from the center, and in a place that wont interfere with construction.


Read More..

Kamis, 25 Agustus 2016


Glassing the Hull 012
Originally uploaded by OzzyC.
We ran out of epoxy. Between applying the base coat to the bare wood, and the bonding coat that bonds the glass cloth to the hull, we went through well over three gallons of epoxy.

This could have some major unintended side effects for us, but Im not sure yet.

The front half of the boat is fine. Im not so sure about the back half. Greg thinks that we can just get more epoxy and continue where we left off. Im concerned that well need to rip up the cloth that didnt get bonded and reapply the cloth. Heres what Im thinking...

Weve got the base layer of epoxy applied to the bare wood. Its also ever-so-slightly bonding the fiberglass cloth to the hull. But Im concerned that its not quite right. Im going to ask Jacques over at the boat forum and get his input. Ill let you know when I get the answer.
Read More..