Tampilkan postingan dengan label epoxy. Tampilkan semua postingan

Sabtu, 14 Januari 2017


Boys Trip 2006 035
Originally uploaded by OzzyC.
Per our tradition, we took our boys trip over Memorial Day weekend. For several years we have been travelling staying in Nicolette Forest in northease Wisconsin, for a few days of whitewater kayaking. This year, we decided to get back to our roots and do some canoeing. Greg and I took things a step further, and rigged up the Nice Canoes we built a couple of years ago as a makeshift catamaran. Greg, being engineer-boy, calculated the dimensions, measured the sail, and determined where to put the various parts. It worked surprisingly well -- for one day. The boat was structurally sound, but anything that directly related to the sailing aspect was woefully under-engineered. Stay tuned for the complete story... its quite a ride.
Read More..

Selasa, 10 Januari 2017

The fairing and sanding continues. Greg read about a really neat idea that will likely save us countless hours of eyeballing, and in the end, provide us with a significantly more accurate finished product...

In my last entry, you saw the level that showed approximately how much filling we need to do. Well, Greg decided to wrap that level in plastic, run a strip of filler under where the level was, and then essentially mash the level into the filler and let things dry. After the filler dried, he removed the level, shaved down the excess epoxy and voila, he had a "rail" that gave us a guide for how much filler we need to use. By running a second "rail" down the center, and a third one down the other side, we had a rail system built, which will allow us to roll out a single, thick, accurate layer of filler and dramatically reduce the amount of sanding and fairing we will need to do. A stroke of genius!


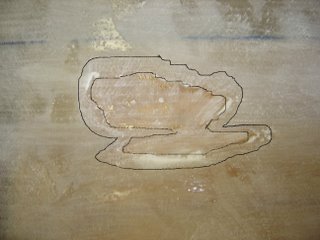
On the downside, when sanding yesterday, we came across a big spot that was starved for epoxy, as shown (and outlined) in the picture to the right. This is an area thats come back to haunt us from way-back-when. The area is approximately 4"X3." Its nothing that cant be overcome, but is a little frustrating.

We have yet to decide how to address the issue, but Greg has two ideas... one is to use fiberglass filler and epoxy, the other is to use glass micro-filler and epoxy. Ive found one or two other spots like this, but theyre small, in non-structural areas, and easy to fix.


Heres another small stroke of genius Greg ran across...

-Are you tired of constantly stirring epoxy and/or thickener?

-Are you working by yourself and would like to save a little time?

-Are you working with fast hardener, and tired of worrying if its going to kick too quickly?

If any of these problems apply to you, then you should try what Gregs doing in this picture to the right. Use a drill (or drill press) and a paint-stirring bit to do the work for you. Its quicker and easier. Just remember to take measures to protect your drill. It would really suck if you ended ruining your drill because it got all gummed up with epoxy.
Read More..

Rabu, 04 Januari 2017


Glassing the Hull 010
Originally uploaded by OzzyC.
The hull is now prepped. A base coat of epoxy has been applied to the entire exterior of the hull. Isnt it shiny?
Read More..

Selasa, 13 Desember 2016


CrappyGluing
Originally uploaded by OzzyC.
After we cut the excess length off of the rear transom, we decided to test the strength of the epoxy. I figured a drop test would be the best way to get a guage of how strong our gluing job was, and I was concerned with the results.

I dropped the excess from about five feet, to see how well it would hold up to a shock. The results werent good. One of the four layers completely broke away. The second layer, as shown in this picture, split about 2/3 of the way through.

The moral of the story?? Use more glue than we did. In order to compensate for the lack of glue, we are going to reinforce the rear transom with several bronze screws. Were going to use bronze screws because they wont corrode over time.
Read More..

Jumat, 14 Oktober 2016


Shower Repair 4
Originally uploaded by OzzyC.
In this picture, you see that I have installed the scrap plywood. the plyowood has been sealed with epoxy, so it should stay waterproof for until I truly remodel this bathroom. Ive screwed it all into place with waterproof screws, and you may see that Ive test-fitted a block of tiles.
Read More..

Kamis, 22 September 2016

We laid some more glass yesterday, but Im going to digress a bit.

You may remember in an earlier post that we had a couple of spots where the fiberglass didnt adhere to the plywood. Our initial plan was to drill small holes in these areas and fill them with epoxy. Greg changed his mind. Instead, he cut out these areas with a knife, and filled it with a mixture of epoxy and fiberglass filler. My camera batteries were dead, so I dont have any pics of this, but I will attempt to get some pics posted soon.

After the fiberglass filling, we did a little last-minute sanding, and laid fiberglass on one side. Weve now got about two-thirds of the exterior completely fiberglassed. We still have one side, and both transoms to do, but that should go relatively quick. Of course Ill post pictures.
Read More..

Jumat, 08 Juli 2016

We received an answer that thoroughly answers the questions regarding the fit problems weve encountered while assembling the hull. The short answer is that its a combination of problems with how the kit was cut at the factory, and assembly error. If youre interested in the long version, Im attaching the response from Jacques, one of the admins at www.bateau.com

---begin original message---
Here are Ryans conclusion[s] and I agree with them. We have looked many times at this and suspected a problem if parts were cut from the nesting drawing. We found only discrepancy . Ryans notes are in italic. My comments are in blue.
-----------------------
"The aft pieces of the hull bottom were too wide where they meet the middle pieces of the hull bottom. I laid out the plan spec dimensions on these pieces and had to cut off slivers approximately 5/8" wide, tapering down to 0", by 20" long, in order for these pieces to meet the plan specs and to get them to butt properly to the middle bottom hull sections. The cuts were on the outside of the pieces."
---->I have no clue about this. The nesting matches the dimensions.
That must have been a CNC machine problem. Fortunately, it was too large and easy to correct.


2) The aft and bow transoms were mounted on the building frame, at the distances and angles specified in the plans. A laser was used to precisely align everything. When the glued and assembled stringers were put in place, it was clear that they were about 3 inches shorter than the distance between the transoms. Part of this distance (1/2") can be explained by the fact that I did not account for the front cabin bulkhead fitting between the aft and bow portions of the stringers, as I had glued them up as one contiguous unit (instead of installing the bow portion of the stringers later, as indicated in the on-line building tutorial). However, having to recess the stringers 1/2 way into the transoms adds 9/16" for the bow transom and 1" for the aft transom (which is 2" thick for large motor usage). This adds up to: 3" - 1/2" + 9/16" + 1" = approximately 4 inches that the stringers were short. I do not recall what the exact measurements are, and I did not try and crawl under the boat to take them again. Thus, I cannot say whether this is a plan or kit error."
---->the kit: The transom that was in the nesting was too big. It was about 1-7/8" too big. The stringer tips in the nesting were about 1" too short.

The CNC file for those parts was taken from the nesting drawing but the nesting drawing is not to scale!
You corrected properly.


"This problem was corrected by moving the bow transom aft the proper distance so that the stringers would fit right. I knew this could change the way the bottom panels fit, so when we put the aft 3 building molds in, we reduced the distance between each of them a small amount. This was done because the bottom is much flatter in this area and I knew it would affect the shape/fit of the panels less than adjusting each mold position or just the front ones."
--->Once they do this.....the frames wont fit right.
That looks like an assembly mistake you made but again, you corrected it properly.

"Some of the kit frames were not wide enough. For example: According to the plans, Frame F should be 90-1/4" wide. The actual measurement is 88-1/4". Frame E should be 92-3/4", and the actual measurement is 90-3/4"."
---->The nesting matched the station dimensions....so I dont know about this.
Me neither . . . were those frames marked correctly?

"Several of the kit pieces that were supposed to be 3/8" plywood were actually 1/2". I have been able to work around this without too much problem and the small amount of extra weight should not affect the performance."
---->Not sure about this one either.
I discussed this with Eric. he asked permission to use 1/2" instead of 3/8 for cutting reasons. I checked and gave the OK, it has no effect on weigth (maybe 5 lbs total!) and can only be better question of strength.
-----------------------
Conclusion, it looks like there were some problems with the kit, some I understand, others not but you solved the problems. Sorry for those cutting mistakes. Email when you need paint or other supplies, well do something special.

All the dimensions on the plans are correct, its a kit problem that does not affect those building from the plans. Eric and I have discussed this. In 95% of the cases, despite what we say on the plans (NTS = Not To Scale), our plans are to scale. Those parts were an exception. Right now, we do not cut kits from the nesting drawing anymore.
_________________
Jacques Mertens

---end original message---

My personal opinion on the whole deal...

The root of the problems were based on errors in the kit. The problem was exacerbated when we adjusted our assembly process upon encountering kit errors, resulting in a chain reaction of minor, correctable issues.

Jacques and crew have been instrumental in figuring out the root of the problem, and theres no doubt in my mind that theyll work with the kit manufacturer to ensure this doesnt happen again. Additionally, they appear to genuinely care about customer satisfaction, as evidenced by their promise to "do something special" next time we order supplies. Despite the fact that weve experienced these minor setbacks, I have been satisfied in my dealings with these guys, and I would freely recommend bateau for anyone who is building a houseboat (or any other type of boat.) "If youre building a houseboat, go to www.bateau.com for the plans, kit and supplies."

By the way, if you do end up ordering from bateau as a result of reading this blog, tell em that OzzyC sent you.
Read More..

Senin, 04 Juli 2016


Patched Epoxy Joint
Originally uploaded by OzzyC.
This is what the joints looked like after layint the thickened epoxy.
Read More..

Senin, 27 Juni 2016


Flaws in the Epoxy
Originally uploaded by OzzyC.
You may remember from our last couple of entries that we ran out of epoxy. In order to overcome this potentially disasterous problem, we heated the cured epoxy with a heat gun, and applied epoxy to the rest of the boat.

This picture shows that, for the most part, our approach worked incredibly well. However, also shown in the picture, we had a few spots that were completely starved and didnt adhere to the hull at all.

How did we overcome this problem??? Read on and find out.
Read More..

Jumat, 24 Juni 2016

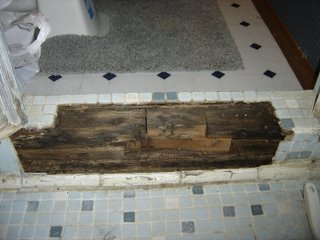
By now, were all familiar with using epoxy and plywood for building boats. But have you considered using plywood and epoxy for other jobs around the house? The previous owner of my house installed a tile shower, and used plain plain 2x4s and plywood for this water-catching lip. Over the years, water has gotten in here, and eventually it rotted away the plywood and the wood.

Im not going to the trouble of completely ripping this out and starting from scratch, but I am going to repair it so it stays put until Im ready to completely overhaul this bathroom. Enter the epoxy and plywood...

During the course of the next couple of weeks, I am going to epoxy the remaining wood, in an attempt to prevent any further deterioration. I will cut some scrap plywood to size and lay a protective layer of epoxy over that as well, which will waterproof the entire base. Finally, I will use thickened epoxy to stick the tiles back into place. Why epoxy instead of cement? Because I have the epoxy and plywood available. Id have to go out and buy the cement. The only reason NOT to use wood is because of the rotting factor. By coating it all with epoxy, I have removed the potential for rotting.
Read More..

Sabtu, 28 Mei 2016


Heating the Transom II
Originally uploaded by OzzyC.
There were a couple of areas on the rear transom where the glass didnt lay down to our liking. Greg decided to see if heating the epoxy in this area would work. After a few minutes, we discovered that the epoxy got very thin and dripped a lot. This tended to starve the fiberglass, didnt help the fiberglass adhere to the plywood at all, and the epoxy that remained in the fiberglass had dried enough to touch after a mere five additional minutes.

In short, I dont recommend using a heat gun on uncured epoxy. Its a good way to give yourself a second chance on cured epoxy though. In fact, Id call it a sheer stroke of genius on Gregs part.
Read More..

Sabtu, 14 Mei 2016


Shower Repair 7
Originally uploaded by OzzyC.
In this photo, you see that Ive done part of the bottom, or side, section. I was fortunate that this section came off in one large sheet, so I didnt have to re-lay individual tiles. The hardest part of re-laying the tiles comes next. Wish me luck.

By the way, if youre interested, you can also see my other home improvement project on my other blog. I figured that it was more appropriate to post this project here, since it so heavily utilizes plywood and epoxy.
Read More..

Kamis, 17 Maret 2016


Shaved Hull
Originally uploaded by OzzyC.
Like I said in my last entry, this heats a killer. We started at around 7:30 and put in about 2 and a half hours. What did we accomplish? Unfortunately not too much.

When we did our test fit last weekend, we saw that the bottom panels were about two inches too wide. So this week we (actually it was just Greg) built a jig so we could draw a line along the hull without removing the sides that wed strapped on, and then we ran a circular saw along the length of the bottom panels and shaved off the extra. In short, we finished about 1/2 hour worth of work in about 2 and a half hours.
Read More..