Minggu, 31 Juli 2016

Let it be stated for the record that this blog is NOT designed to be an infallible guideline for how to do a similar project yourself. As I stated at the beginning of this blog, these posts are designed to chronicle our specific journey, and maybe to provide some tips and tricks that may or may not be beneficial to you. If you incorporate any of the recommendations, you do so at your own risk. If you disregard any of our recommendations, you do so at your own risk. If you even view the contents of this blog, you do so at your own risk. Neither Greg nor I will be responsible in any way, shape or form for anything that you do, whether its a stroke of brilliance, or something worthy of a Darwin Award
Its an unfortunate reality that I feel the need to post this disclaimer, but I dont want any of your silly asses filing a lawsuit against us, saying "Greg and Dave made me do it." We didnt make you do anything!
Read More..

Jumat, 29 Juli 2016

It took about 3 hours to sand the drips, and runs on the skiff to a surface that is almost fair.  I found a couple of spots where the glass had bubbled up and not adhered to the hull .  These places have been faired with WEST System fairing putty and will be sanded down tomorrow.  No photos as this is just grunt work.  Pretty boring and my least favorite part of boatbuilding. 

For the skeg, I am laminating up a 3/4 X 3 1/2  piece from 1/2" marine ply with a lamination of leftover Okoume.  All the other stuff in the garage is the wrong dimension or warped.  Skeg needs to be straight.  pretty easy to clamp along the top of a sawhorse, will use release film so it doesnt stick.  This should work.   

If there is a moral here, it would be to apply thin coats of epoxy and dont get greedy.  It is going to take 3 coats no matter what.  If you put too much on, it will just run and need to be cleaned up. 

Hope to get the third coat on tomorrow.  Looking like this really will be a first class finish.  I am looking at painting with the Ben Moore oil base if I can find it.  High gloss. 
Read More..
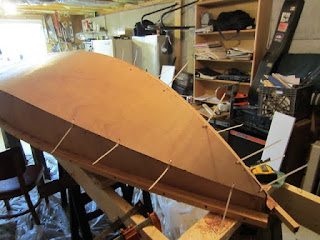
So far, the sanding and fairing process has been very smooth.  spent an hour today with the hand plane knocking down the globs and cutting off the bungs, then following up with the Makita palm sander.  I wish the Random Orbit sander was not broken, but it is.  Got half the exterior sanded and faired in one hour.  Will do the other half next weekend and will decide on the fiberglass issue.  To glass or not to glass. 
Transom corner. 

Starboard side and bottom have been faired and sanded.

??
oops!  a small flat spot.  Will probably live with it.  Wont be visible unless the boat is upside down.
It is interesting to see just how smooth these bow seams can be.  15 minutes with the block plane followed up with the palm sander and 60 grit.
??
prior to sanding. 


This area still needs some finishing with the plane and sander, but the seams leading up to the stem came out good.

Another view of the bow and stem.  I did some trimming, but am working slow here.

this boat is a candidate for a clear finish.  as the wood is almost too nice to hide behind paint.  Perhaps a coat of 4 oz glass followed up by spar varnish and sanded smooth will do the trick.
Read More..

Selasa, 26 Juli 2016

Building this boat is kind of like dancing a box step... step forward, step sideways, step back, step sideways, repeat ad nauseum. Greg decided that he didnt like the red finish on the bottom... too much orange peel texture for him. So we sanded it smooth and tried a roll and tip. It wasnt good enough. Now Gregs decided to do an epoxy-based, black-tinted bottom, infused with graphite, giving us a smooth bottom that (theoretically) will give us a more durable bottom coat that does a better job of sliding over rocks without killing the paint. He had done the copper-infused bottom paint, but since were going to be running this almost exclusively in fresh water, hes not concerned about buildup on the bottom.
Read More..

Senin, 25 Juli 2016

Greg and I had an impromptu boat work session today. After about five hours, we had shored up the unstable frame pieces, removed the old frame (which is no longer necessary, since the boat is now flipped) and have removed the boats structural frame pieces.

Over the next few days, my younger daughter will be removing nails from the lumber that were able to salvage, while Greg and I remove the boats stringers, leaving us with a hollow shell. Next comes glassing the inside of the boat, in preparation for re-installing the boats stringers and structural frame pieces.
Read More..

Minggu, 24 Juli 2016


On Saturday, November 1, 2008. 11 Participants in the Boat Building by the Bay project traveled over to Edgewater to visit the Smithsonian Environmental Research Center for a wonderful afternoon of canoeing on the Rhodes River. Under the leadership of Karen McDonald and George Smith the participants learned paddling/steering techniques,about the wildlife in the area, history of the canoe, and what happens at SERC.
The weather was picture perfect and this is what some of the participants had to say about the day:

I learned about water animals. ~Tiant age 12

I went canoeing and sat in the back of the boat. I had to stick my oar into the water to steer. ~ Mauricus age 13

SERC is a water research center that studies wildlife. ~Maurice age 15

The water appeared dirty, because it was very dirty in the Rhode River. ~ Mekhi age 10

I had fun learning how to canoe. ~ Kenan age 9

I love going canoeing. Im excited to go to Sarles to learn how to build a boat. ~Jaquan age12


Read More..
Last week we saw the results of our first coat of paint and were not pleased. Lots of lines in the paint. Greg decided to sand the paint smooth and start again. This time around, things look better, and weve agreed not to do any more sanding until the second-to-last coat is applied. This way we have a build-up of paint. Next week, another coat.
Read More..

Sabtu, 23 Juli 2016

Greg and I laid our first coat of paint last night! We painted the portion of the bottom and sides that will be underwater, and after being stuck in sanding and fairing hell for a couple of years, words cannot properly express the gratification that simple coat of paint brought us.

The paint itself was a little different than I expected. I expected a bright red, high-gloss finish. What we saw was rust-colored and had a flat finish. The paint was more watery than a latex paint, but it ran less and dried very quickly. Since I didnt expect to paint, I didnt bother to take the camera, so no pics. Next time.

Man, Im stoked!
Read More..

Selasa, 19 Juli 2016

Building your own boat can be cheaper than buying a manufactured boat. It can also be a great hobby for anyone who has some basic carpentry experience and enjoys working with their hands. A boat that you have made yourself can be a thing of pride and beauty and something to treasure for years to come. Of course, it takes a good deal of time and, though not as much as you would spend on a premade boat, a decent amount of money. Considering this, you certainly don’t want to just jump in and start such a project without the proper knowledge and the perfect boat plan.

The Internet is full of boat plans. Many companies sell boat plans for a small price. However, they aren’t all worth the price. A lot of plans found online are quite old, so the finished boat could be an older design which might have several technical faults in the hull construction. The simplicity and convenience of using the Internet to find a boat plan won’t matter if you end up with a plan that will not work for you.

You cannot know how your boat will behave in the water or in rough weather conditions on the ocean. Large companies have the gear and knowledge to test these conditions. They normally use scale models of an original design in specially-designed software in research labs before building a life-sized prototype. Obviously, you are not going to be able to perform such tests.

Another option is to spend lots of money and spend many work hours building your boat, then test it in real-life conditions. Can you imagine your distress at going through so much trouble, only to watch your brand-new boat fail the test? Unless you have time, money and energy to burn, this is definitely not an appealing option!

There is another way to make sure you’ve chosen a boat plan that will help you make your dream boat. This option doesn’t involve laboratories or crossing your fingers and hoping for the best. Instead, when shopping around for a boat plan, look for all the reviews you can find on each seller. If you can find positive testimonies from happy customers about a company, you will definitely be on the right track. If you want to have a better chance at making sure all of your time, money and effort won’t be spent in vain, it will be worth it to you to spend a few days looking for just the right plan.
Read More..
I installed the cross braces at station 3 and 10 today.  Michalak says the one at 3 is probably optional, but I plan on keeping it as it might make a nice place to tie a temporary anchor or help tie it to the roof of the car. 

This is the bottom, zip tied in place.  I was using wire, but gave up after punching a few holes in my hands.  This is much more user friendly. 

The bow twist is a little difficult to get to lie flat.  From here it is nothing some filler (ok, lots of it) and glass wont hide.  This took a lot of patience and some easing the center seam with a hand saw.  I was just glad that I put the halfs together in the correct orientation.  That would have been annoying.  The zip ties work well.  I believe I can sand right over them and leave them inside the putty. 


Another view. 

I got a little too aggresive easing the center seam in the middle of the boat.  Once again, filler and sanding should hide it pretty good.  I am not looking forward to working upside down in here.

?
These 1/4" holes allowed me to use a larger size zip tie 8" long.  that really helped a lot with the assembly.  If I were to do it again, I would loosely join the two panels, secure the edges and do the final trimming on the centerline last. 
?
Read More..

Senin, 18 Juli 2016

Man, I cant believe its been over three weeks since Ive updated this blog. Even worse, I cant believe its been that long since anything has been accomplished on the boat. The lack of progress will hopefully come to an end tomorrow though, as Greg and I get back into the swing of things. Im a little disappointed that our progress has stalled, but its because Ive been out of town, so Ill cut myself a little slack... of course theres nothing thats prevented Greg from working on the boat while Ive been gone, but thats another story.

Ive already discussed the Boys Trip we had over Memorial Day weekend, but I havent mentioned my family vacation to the Buffalo, NY area. That trip was a blast, but its a little off-topic for this blog. If youre interested in reading about it though, feel free to head on over to my other blog.
Read More..

Minggu, 17 Juli 2016


Dvd tutorial nail art
Tehnik mengecat kuku step by step

Dengan kreativitas tinggi, kuku bisa dibuat lebih cantik dan unik. Teknik menghias kuku tersebut adalah nail art. Metode yang digunakan ternyata cukup simpel.
 Video tutorial nail art step by step

Nail art telah menjadi tren dan banyak digunakan oleh para wanita untuk membuat kuku menjadi lebih indah. 
Karena Nail Art dapat menjadi solusi untuk mempercantik kuku Anda.
Seni menggambar di kuku ini sama sekali bebas jarum, dan tentunya juga gambar yang menumpang di atas kuku bisa Anda pilih sendiri. Kuku tidak hanya terlihat lebih cantik, tetapi juga unik.

Tidak seperti tato yang butuh pengerjaan oleh ahli tato, seni menghias kuku agar tampak lebih cantik ini juga bisa Anda lakukan sendiri kok. Untuk kuku yang pendek pun tidak luput dari nail art. Tentunya dengan beberapa hal penting yang harus diperhatikan, seperti menghindari pola berkesan memotong. Ini akan membuat jari terlihat lebih pendek, seperti pola French. Lebih baik pilih pola dengan corak yang sederhana, seperti bola-bola dalam paduan warna soft.

Drawing Disini digunakan cat kuku khusus untuk mengaplikasikan lukisan tertentu pada kuku Anda.
Sticker Teknik yang paling simple, karena hanya dengan menempelkan gambar dengan pola yang diinginkan pada kuku.
Swarovski French Pernah dengar French Manicure? Metode nail art yang satu ini juga berdasarkan pada pola French Manicure. Cirinya two tone dengan perpaduan warna yang satunya lebih menonjol, seperti nuansa gold atau merah metalik di ujung kuku.
Mix Sudah pasti tentunya menggabungkan antara beberapa teknik diatas menjadi satu.


Nail art tentu ada tehnik-tehnik agar nantinya akan terlihat cantik dan indah.
Buat para wanita yang ingin mengecat di salon atau bahkan bisa di lakukan sendiri berikut dvd tehnik mengecat kuku.

Dvd tutorial nail art
Tehnik mengecat kuku step by step

Isi paket 14 video tutorial nail art
  1. Cherry heart & squares nail art design tutorial
  2. Everyday creative nail art designs
  3. Flower nail art design
  4. Flower nail for summer
  5. French kiss red lips design-robin moses nail art
  6. Golden swirls dots & flower purple glitter nail art design
  7. Green glitter flower nail art design tutorial
  8. Nail art tutorial-Tribal nails
  9. Retro circles on french manicure design robin moses nail art
  10. Robin moses nail art tutorial
  11. Roller derby rabbit on skates design-robin moses nail art
  12. Spring flower nail art design 
  13. springtime bloom nail art tutorial
  14. Strawberry shotcake and other design shenanigans-robin moses nail art

Keterangan : Video bisa diputar di komputer dan player
Dvd tutorial nail art
Harga Rp 75.000.-

Read More..
Thats not exactly true, but it feels good so say it and mean it... at least in this context. Yes folks, Greg finally said "good enough" and decided it was time to paint. In a desire to support this decision (and get a coat of paint on the boat before he changed his mind), we did a rare Saturday session. Between the final round of sanding (a quick but thorough sanding of both transoms and sides with 220-grit sandpaper), prepping the surface, mixing the paint, and the roll and tip process, we put in roughly four hours.

We had the little Ozzlet there to help us out. Shes a great little photographer, and she also helped us prep the surface, paint a little of the hull (rolling, not tipping) and she watched Gregs girls.

On Tuesday (our regularly scheduled boatbuilding day), we will do some light sanding as needed and apply a second coat of paint. Were planning to flip the boat sometime between late November and mid-December.

I know well be doing some touch-up sanding between coats, and I understand that well be doing another round of sanding and fairing when we build the deck and cabin, but it shouldnt be quite as long and arduous as the hull. I cant describe how gratifying it is to be out of sanding and fairing hell.

I have several more pictures here...

Or, you can view the slideshow here.
Read More..

Sabtu, 16 Juli 2016

Purchased 3 sheets of 6mm Okoume to start the project.  This is 5 ply BS1088 stuff


and should be durable as long as it is kept painted.  Will be glassing the exterior and perhaps the interior as well.  Although, do not want to add too much weight as this is to be a car topper.

5 mm ply can also be used, and Boulter did have it in 5 ply despite their web site stating it was 3 ply. 

Will
lay out the panels tomorrow.
Read More..

Rabu, 13 Juli 2016

Greg and I have had a second session of boat work. Okay, it wasnt really, directly, actually working on the boat itself, but were making progress toward getting back at the task of constructing the boat.

Yesterday, I helped him mount his air compressor to the floor in the garage. Hes been there over a year now, and is just now getting around to this task. That should help you all understand why and how such a long hiatus occurred in the first place.

The next thing you need to understand is that the boats shell has become a sort of storage container. Specifically, he stored a canoe, a touring kayak, and many, many aluminum pop and beer cans in the hull of his yet-to-be-named watercraft-in-the-making. After mounting the air compressor, we hung some pulleys from the ceiling, which allowed Greg to hang the canoe and kayak, thus allowing us to resume our project.

You may notice that were now doing this every other weekend. This means that the boat will probably be finished in about two years -- assuming that we dont take any more sabbaticals. It also means that well probably be ready to actually work on the boat itself in approximately one month. Next week, we will finish shoring up the trailer, and finish wiring the air compressor -- if Greg hasnt completed that task by our next boat building session.
Read More..
Seni Menampilkan cuplikan Peristiwa Bersejarah dalam bentuk miniatur 3 Dimensi


Diorama adalah miniatur tiga dimensi untuk menggambarkankeadaan sesungguhnya dari landskap keadaan sejarah, kejadian alam, dan keadaan kota untuk kebutuhan pendidikan atau pertunjukan. Di Indonesia Diorama belum berkembang luas, diorama lebih dikenal hanya dilingkup museum dan monumen saja sebagai peraga kisahSejarah Perjalanan Bangsa   dan kisah kehidupan manusia purba.
Salah satu kurang berkembangnya dunia diorama di Indonesia adalah minimnya literatur yang ada. Semoga panduan membuat diorama ini bisa jadi pemicu dan pemacu buat rekan-rekan yang ingin mengembangkan dunia diorama di Indonesia, karena dalam dunia modern ini, diorama bukan sekedar miniatur replika kejadian sejarah, namun bisa berarti juga miniatur super market, miniatur komplek perumahan yang akan dibangun, miniatur kapal. Dan masih banyak yang bisa dirambah oleh diorama ini. Siapa tahu bisa jadi sumber penghasilan nih !


Ebook  (14 ebook) :
Building Military Dioramas vol 1 - Vol. 8
How to Build Dioramas
Military Vehicles Vol 1 - Vol. 3
The Art of The Diorama
Warmachines 10 IDF Tiran 4 T54 Tiran 5 T55 Tiran 6 T62

Harga Rp 60.000
Read More..

Jumat, 08 Juli 2016

We received an answer that thoroughly answers the questions regarding the fit problems weve encountered while assembling the hull. The short answer is that its a combination of problems with how the kit was cut at the factory, and assembly error. If youre interested in the long version, Im attaching the response from Jacques, one of the admins at www.bateau.com

---begin original message---
Here are Ryans conclusion[s] and I agree with them. We have looked many times at this and suspected a problem if parts were cut from the nesting drawing. We found only discrepancy . Ryans notes are in italic. My comments are in blue.
-----------------------
"The aft pieces of the hull bottom were too wide where they meet the middle pieces of the hull bottom. I laid out the plan spec dimensions on these pieces and had to cut off slivers approximately 5/8" wide, tapering down to 0", by 20" long, in order for these pieces to meet the plan specs and to get them to butt properly to the middle bottom hull sections. The cuts were on the outside of the pieces."
---->I have no clue about this. The nesting matches the dimensions.
That must have been a CNC machine problem. Fortunately, it was too large and easy to correct.


2) The aft and bow transoms were mounted on the building frame, at the distances and angles specified in the plans. A laser was used to precisely align everything. When the glued and assembled stringers were put in place, it was clear that they were about 3 inches shorter than the distance between the transoms. Part of this distance (1/2") can be explained by the fact that I did not account for the front cabin bulkhead fitting between the aft and bow portions of the stringers, as I had glued them up as one contiguous unit (instead of installing the bow portion of the stringers later, as indicated in the on-line building tutorial). However, having to recess the stringers 1/2 way into the transoms adds 9/16" for the bow transom and 1" for the aft transom (which is 2" thick for large motor usage). This adds up to: 3" - 1/2" + 9/16" + 1" = approximately 4 inches that the stringers were short. I do not recall what the exact measurements are, and I did not try and crawl under the boat to take them again. Thus, I cannot say whether this is a plan or kit error."
---->the kit: The transom that was in the nesting was too big. It was about 1-7/8" too big. The stringer tips in the nesting were about 1" too short.

The CNC file for those parts was taken from the nesting drawing but the nesting drawing is not to scale!
You corrected properly.


"This problem was corrected by moving the bow transom aft the proper distance so that the stringers would fit right. I knew this could change the way the bottom panels fit, so when we put the aft 3 building molds in, we reduced the distance between each of them a small amount. This was done because the bottom is much flatter in this area and I knew it would affect the shape/fit of the panels less than adjusting each mold position or just the front ones."
--->Once they do this.....the frames wont fit right.
That looks like an assembly mistake you made but again, you corrected it properly.

"Some of the kit frames were not wide enough. For example: According to the plans, Frame F should be 90-1/4" wide. The actual measurement is 88-1/4". Frame E should be 92-3/4", and the actual measurement is 90-3/4"."
---->The nesting matched the station dimensions....so I dont know about this.
Me neither . . . were those frames marked correctly?

"Several of the kit pieces that were supposed to be 3/8" plywood were actually 1/2". I have been able to work around this without too much problem and the small amount of extra weight should not affect the performance."
---->Not sure about this one either.
I discussed this with Eric. he asked permission to use 1/2" instead of 3/8 for cutting reasons. I checked and gave the OK, it has no effect on weigth (maybe 5 lbs total!) and can only be better question of strength.
-----------------------
Conclusion, it looks like there were some problems with the kit, some I understand, others not but you solved the problems. Sorry for those cutting mistakes. Email when you need paint or other supplies, well do something special.

All the dimensions on the plans are correct, its a kit problem that does not affect those building from the plans. Eric and I have discussed this. In 95% of the cases, despite what we say on the plans (NTS = Not To Scale), our plans are to scale. Those parts were an exception. Right now, we do not cut kits from the nesting drawing anymore.
_________________
Jacques Mertens

---end original message---

My personal opinion on the whole deal...

The root of the problems were based on errors in the kit. The problem was exacerbated when we adjusted our assembly process upon encountering kit errors, resulting in a chain reaction of minor, correctable issues.

Jacques and crew have been instrumental in figuring out the root of the problem, and theres no doubt in my mind that theyll work with the kit manufacturer to ensure this doesnt happen again. Additionally, they appear to genuinely care about customer satisfaction, as evidenced by their promise to "do something special" next time we order supplies. Despite the fact that weve experienced these minor setbacks, I have been satisfied in my dealings with these guys, and I would freely recommend bateau for anyone who is building a houseboat (or any other type of boat.) "If youre building a houseboat, go to www.bateau.com for the plans, kit and supplies."

By the way, if you do end up ordering from bateau as a result of reading this blog, tell em that OzzyC sent you.
Read More..

Rabu, 06 Juli 2016

As I mentioned before, these last couple of sessions havent yielded any progress on the boat itself. We have, however, been laying the ground work for moving forward with the actual project. During our last couple of sessions, weve installed his air compressor, reinforced the supports on the boat trailer, and worked on making sure that the boat is level in relation to the trailer. The latter two pieces of work will allow us to make sure that the boat is built true, with no sagging or unexpected unevenness in the floor.

Our goal is to work on the boat itself next time. We plan to install and secure the cross-member frame pieces.
Read More..
Read More..

Selasa, 05 Juli 2016


Akeem looks on as George leads the group in attaching the sides of the canoe.


Nine members of Group 2 were on hand Saturday, March 14th to construct their canoe into looking like a boat. The group followed the same steps as Group #1 the week before and here is what they had to say:
Keshawn- Today we put together the boat using 5200 glue and drilled together the pieces.We also sanded the support boards for the seats.
MJ- Sanding was fun, we made a mess, while we were smoothing the pieces.
on the other hand Akeem agreed that sanding was messy, but found it to be hard work.
Anthony- It was exciting putting the boats together and sanding the boards. I like drilling the screws into the boat.
Perry- I liked putting the boat together with the screws and glue. There wasnt anything about the day that I didnt like.
Mauricus- We connected the boats and saw how they bend together.
T. Graham- We got to do more than we usually do. I liked it when the boat crackled.
Maurice- I learned something new today. The plane is used like a chisel, it shaved off pieces of wood and made the boat smooth.
Tammy- I had a fun time and am optimistic about the completion of the project.


Read More..

Senin, 04 Juli 2016


Patched Epoxy Joint
Originally uploaded by OzzyC.
This is what the joints looked like after layint the thickened epoxy.
Read More..

Sabtu, 02 Juli 2016

Mesin Tempur Modern DVD Militer 
Tentang sejarah dan macam2 jenis mesin tempur modern terutama Tank. mulai dari era Perang Dunia I, Perang Dunia II hingga jaman modern.

Tank adalah kendaraan tempur yang sangat kuat. Walau begitu, tank tidak beroperasi sendirian. Tank biasa dimasukkan dalam unit lapis baja pada pasukan terpadu, yaitu gabungan antara infanteri dan kavaleri lainnya. Tanpa dukungan unit lain, tank, walaupun memiliki pelindung tebal, tetap bisa dilumpuhkan oleh infanteri, ranjau, artileri, dan helikopter atau pesawat. Tank juga tidak efektif di medan hutan dan perkotaan, di mana kemampuan jarak jauh tank jadi tidak bisa dipakai, penglihatan pengendara tank jadi terbatas, dan meriam tank mungkin tidak bisa berputar secara maksimal.
Tank dan taktik kendaraan lapis baja telah berevolusi selama hampir seabad. Walaupun sistem senjata dan pelindung tank masih terus dikembangkan, banyak negara yang mulai mempertanyakan kebutuhan kendaraan berat seperti ini, khususnya dalam era perang non-konvensional

Tank ringan, yang beratnya kurang dari sepuluh ton, digunakan untuk tugas pemantauan, dan hanya dipersenjatai senapan mesin ringan yang hanya ampuh digunakan melawan tank ringan lainnya. Tank sedang atau tank cruiser , lebih berat dan bertujuan untuk perjalanan cepat jarak jauh. Dan yang terakhir, tank berat atau tank infanteri , adalah tank dengan lapisan pelindung yang berat, yang berjalan lambat. Tank ini dibuat untuk digunakan untuk menembus pertahanan bersama-sama dengan infanteri. Pelindungnya yang berat membuatnya bisa tahan ditembak senjata anti-tank. Setelah tank berat dan infanteri berhasil melubangi garis pertahanan lawan, tank sedang akan dikirim melalui lubang tersebut dan menyerang jalur logistik dan satuan komandan. Taktik seperti ini akhirnya dikembangkan oleh Jerman dalam konsep blitzkrieg .
Isi Paket : 54 ebook

Video :
Koleksi Video Klip Main Battle Tank
Koleksi Klip Pertempuran PD I dan II

Harga : Rp 50.000,- 
Read More..